
오랜만에 모바일 후킹을 복기 하기 위해 uncrackable 1 풀이를 해봅시다.
Uncrackable 1
These are the UnCrackable Apps for Android and iOS, a collection of mobile reverse engineering challenges. These challenges are used as examples throughout the OWASP MASTG. Of course, you can also solve them for fun.
Decomfile Code
제일 먼저 Androidmenifest.xml을 보면 category android:name=”android.intent.category.LAUNCHER” 으로 설정된 액티비티를 볼 수 있습니다.
일반적으로 해당 액티비티가 제일 처음으로 구동되는 액티비티입니다.
여기에서는 제일 먼저 구동되는 액티비티는 sg.vantagepoint.uncrackable1.MainActivity를 알 수 있습니다.
1
2
3
4
5
6
7
8
9
10
11
12
<?xml version="1.0" encoding="UTF-8"?>
<manifest android:versionCode="1" android:versionName="1.0" package="owasp.mstg.uncrackable1" xmlns:android="http://schemas.android.com/apk/res/android">
  <uses-sdk android:minSdkVersion="19" android:targetSdkVersion="28"/>
  <application android:allowBackup="true" android:icon="@mipmap/ic_launcher" android:label="@string/app_name" android:theme="@style/AppTheme">
    <activity android:label="@string/app_name" android:name="sg.vantagepoint.uncrackable1.MainActivity">
      <intent-filter>
        <action android:name="android.intent.action.MAIN"/>
        <category android:name="android.intent.category.LAUNCHER"/>
      </intent-filter>
    </activity>
  </application>
</manifest>
Lifecycle
안드로이드 LifeCycle를 보면 onCreate 메소드가 제일 먼저 실행되는 것을 알 수 있습니다.
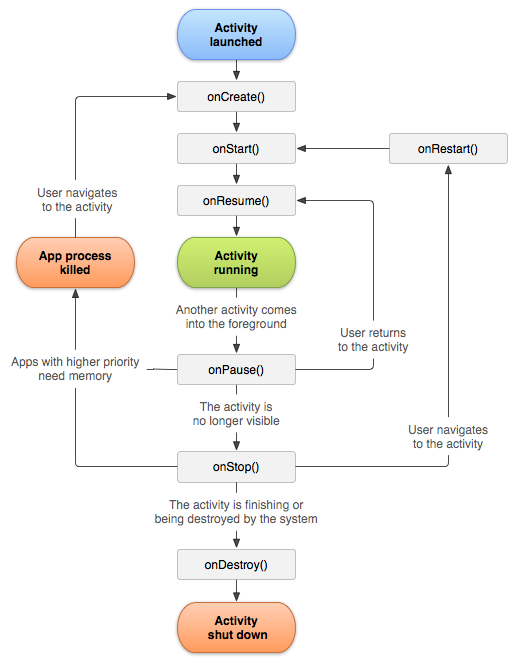
onCreate()
onCreate() 메소드를 보면 c.a, c.b, c.c의 결과를 통해 Root detected! 메시지를 출력하고 있습니다.
b.a를 통해 디버깅 탐지메시지도 출력하고 있습니다.
각 함수가 어떻게 동작하는지 알아봅시다.
1
2
3
4
5
6
7
8
9
10
11
12
13
    @Override  // android.app.Activity
    protected void onCreate(Bundle arg2) {
        if((c.a()) || (c.b()) || (c.c())) {
            this.a("Root detected!");
        }

        if(b.a(this.getApplicationContext())) {
            this.a("App is debuggable!");
        }

        super.onCreate(arg2);
        this.setContentView(0x7F030000);  // layout:activity_main
    }
c.a()
c.a() 메서드의 로직은 아래와 같습니다.
su를 사용하려면 루팅이 되어 있어야 하므로 이를 이용한 루팅 탐지라는 것을 확인할 수 있습니다.
getenv("PATH")를 통해 환경 변수의 값을:으로 분리하여v0에 저장
-> PATH 환경 변수에서 각 디렉토리의 경로가 저장v0의 길이 만큼su를 사용하여 파일 객체를 생성하고exist()메서드를 사용하여 해당 파일이 실제로 존재하는지 확인- 존재하는 파일이면
true를 리턴 - 전부 존재하지 않는 파일 이면
false를 리턴
1
2
3
4
5
6
7
8
9
10
11
    public static boolean a() {
        String[] v0 = System.getenv("PATH").split(":");
        int v3;
        for(v3 = 0; v3 < v0.length; ++v3) {
            if(new File(v0[v3], "su").exists()) {
                return true;
            }
        }

        return false;
    }
c.b()
c.a() 메서드의 로직은 아래와 같습니다.
Build.TAGS는 안드로이드 기기의 빌드 태그 정보를 가져옵니다.
blog에 잘 정리되어 있습니다.
Release-keys로 서명이 되어있지 않고, test-keys로 서명이 되어 있는 것을 판단하여 루팅을 탐지 하는 로직입니다.
- Build.TAGS가 null이 아니고, Build.TAGS에서
test-keys라는 문자열을 포함하고 있으면True를 반환 - 그렇지 않으면
False를 반환
1
2
3
   public static boolean b() {
        return Build.TAGS != null && (Build.TAGS.contains("test-keys"));
    }
c.c()
c.c() 메서드의 로직은 아래와 같습니다. v0에 저장된 스트링들이 실제로 존재하는지 판단하여 존재하는 경우 루팅으로 탐지 하는 로직입니다.
- 배열에 루팅 탐지나 슈퍼 유저 권한을 확인하기 위해 사용되는 경로 및 파일 이름들을 저장
- 배열의 길이 만큼 File 객체를 생성하고 디렉토리나 파일들이 실제로 존재하는지 확인
- 존재할 경우
True리턴 - 존재하지 않을 경우
False리턴
1
2
3
4
5
6
7
8
9
10
11
    public static boolean c() {
        String[] v0 = {"/system/app/Superuser.apk", "/system/xbin/daemonsu", "/system/etc/init.d/99SuperSUDaemon", "/system/bin/.ext/.su", "/system/etc/.has_su_daemon", "/system/etc/.installed_su_daemon", "/dev/com.koushikdutta.superuser.daemon/"};
        int v3;
        for(v3 = 0; v3 < v0.length; ++v3) {
            if(new File(v0[v3]).exists()) {
                return true;
            }
        }

        return false;
    }
Rooting Bypass Frida
execute uncrackable-1
먼저 앱을 그냥 실행 시키면 루팅 탐지 메시지와 함께 종료됩니다.

onCreate() 메서드에서 루팅이 탐지되면 this.a("Root detected!"); 코드가 호출됩니다.
Root detected AlertDialog창이 나타면서 System.exit(0)을 통해 종료하는 것을 알 수 있습니다.
1
2
3
4
5
6
7
8
9
10
11
12
13
14
    private void a(String arg4) {
        AlertDialog v0 = new AlertDialog.Builder(this).create();
        v0.setTitle(arg4);
        v0.setMessage("This is unacceptable. The app is now going to exit.");
        v0.setButton(-3, "OK", new DialogInterface.OnClickListener() {
            @Override  // android.content.DialogInterface$OnClickListener
            public void onClick(DialogInterface arg1, int arg2) {
                System.exit(0);
            }
        });
        v0.setCancelable(false);
        v0.show();
    }
hooking rooting bypass
프리다를 이용하여 이를 후킹하는 코드를 작성해봅시다.
exit() 함수를 후킹하여 종료를 막을 수도 있고, c.a(), c.b(), c.c() 의 리턴 값을 변조하여 우회할 수도 있지만 Java의 API를 후킹하여 우회를 해봅시다.
c.a()와 c.c() 로직은 exists 함수를 후킹하여 로직에 걸리는 부분을 false를 주어 우회할 수 있습니다.
c.b()는 Build.TAGS가 release-keys로 설정되어 있습니다. 그래도 우회하는 코드를 작성했습니다.
1
2
3
4
5
6
7
8
9
10
11
12
13
14
15
16
17
18
19
20
21
22
23
24
25
26
27
Java.perform(function(){
    console.log("hook")
    exist_su_bypass();
    test_key_bypass();
});


function exist_su_bypass(){
    var File = Java.use("java.io.File");
    File.exists.implementation = function(){
        if(this.getName().indexOf("su") > -1){
            console.log("[+] "+this.getName() + " Bypass");
            return false;
        }
        return this.exists()
    }
}

function test_key_bypass(){
    var Build = Java.use("android.os.Build");
    console.log("[+] "+Build.TAGS.value);
    Build.TAGS.value = "release-keys";

}

}
Verity
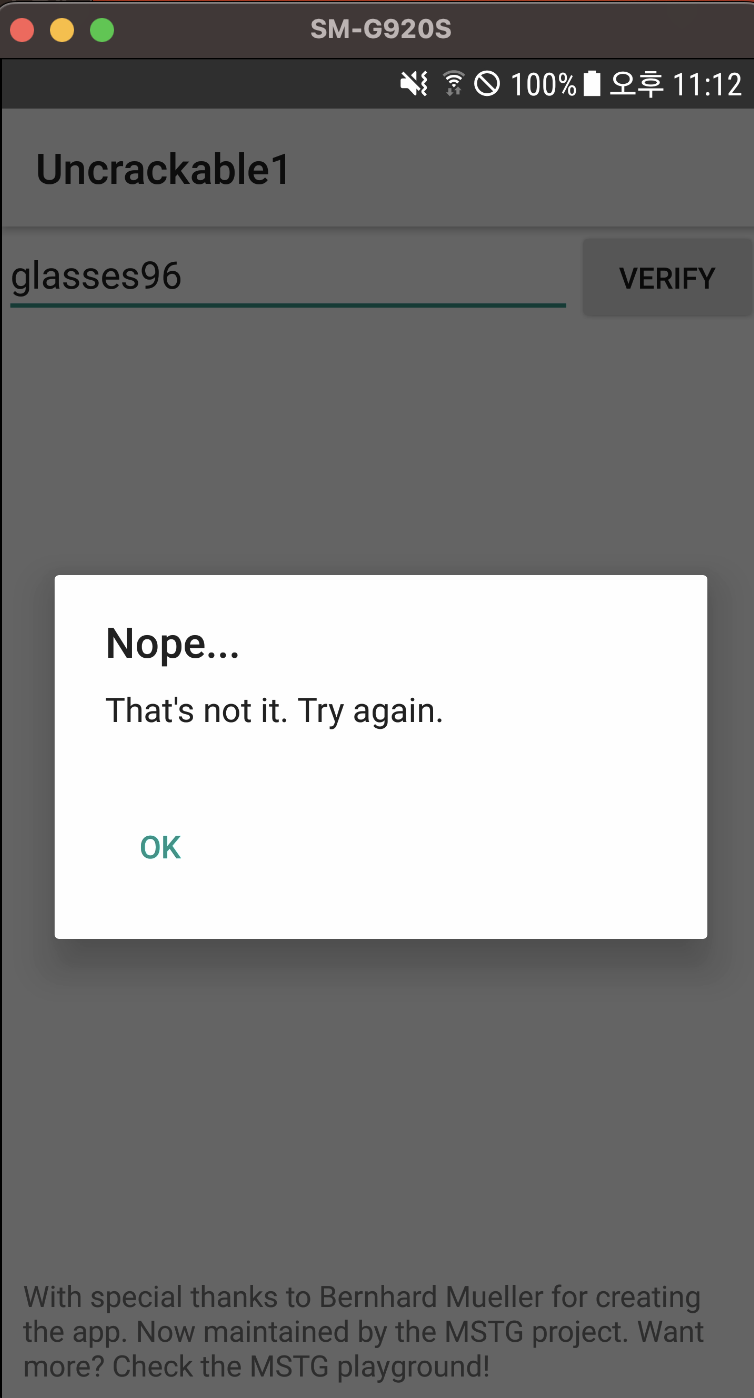
VERIFY 버튼을 클릭하면 Nope… 문자열이 출력됩니다.
a.a(v4) 결과가 참이여야 Success로 분기할 수 있습니다.
1
2
3
4
5
6
7
8
9
10
11
12
13
14
15
16
17
18
19
20
21
22
public void verify(View arg4) {
        String v4_1;
        String v4 = ((EditText)this.findViewById(0x7F020001)).getText().toString();  // id:edit_text
        AlertDialog v0 = new AlertDialog.Builder(this).create();
        if(a.a(v4)) {
            v0.setTitle("Success!");
            v4_1 = "This is the correct secret.";
        }
        else {
            v0.setTitle("Nope...");
            v4_1 = "That\'s not it. Try again.";
        }

        v0.setMessage(v4_1);
        v0.setButton(-3, "OK", new DialogInterface.OnClickListener() {
            @Override  // android.content.DialogInterface$OnClickListener
            public void onClick(DialogInterface arg1, int arg2) {
                arg1.dismiss();
            }
        });
        v0.show();
    }
a.a
내가 입력한 문자열이 arg5으로 들어가고 어떤 로직을 처리한 v1과 비교하여 같은지 판단을 합니다.
어떤 로직을 보니 AES로 암호화되어 리턴을 합니다.
1
2
3
4
5
6
7
8
9
10
11
12
13
14
15
16
17
18
19
20
21
22
23
24
25
public class a {
    public static boolean a(String arg5) {
        byte[] v1 = Base64.decode("5UJiFctbmgbDoLXmpL12mkno8HT4Lv8dlat8FxR2GOc=", 0);
        byte[] v2 = new byte[0];
        try {
            return arg5.equals(new String(sg.vantagepoint.a.a.a(new byte[]{(byte)0x8D, 18, 0x76, (byte)0x84, -53, -61, 0x7C, 23, 97, 109, (byte)0x80, 108, -11, 4, 0x73, -52}, v1)));
        }
        catch(Exception v0) {
            Log.d("CodeCheck", "AES error:" + v0.getMessage());
            return arg5.equals(new String(v2));
        }
    }

    // String Decryptor: 1 succeeded, 0 failed
    public static byte[] b(String arg7) {
        int v0 = arg7.length();
        byte[] v1 = new byte[v0 / 2];
        int v2;
        for(v2 = 0; v2 < v0; v2 += 2) {
            v1[v2 / 2] = (byte)((Character.digit(((char)arg7.charAt(v2)), 16) << 4) + Character.digit(((char)arg7.charAt(v2 + 1)), 16));
        }

        return v1;
    }
}
1
2
3
4
5
6
7
8
public class a {
    public static byte[] a(byte[] arg2, byte[] arg3) {
        SecretKeySpec v0 = new SecretKeySpec(arg2, "AES/ECB/PKCS7Padding");
        Cipher v2 = Cipher.getInstance("AES");
        v2.init(2, v0);
        return v2.doFinal(arg3);
    }
}
a.a.a
리턴 값을 후킹 하면 73,32,119,97,110,116,32,116,111,32,98,101,108,105,101,118,101이 나옵니다.
이를 ascii -> string으로 변환해주면 문자열을 획득할 수 있습니다.
1
2
3
4
5
6
7
8
9
10
11
12
13
14
15
16
17
18
function ascii_string(string_arg){
    var FLAG ="";
    for (var i=0;i<string_arg.length;i++){
        FLAG += String.fromCharCode(string_arg[i]);
    }
    console.log("[+] verity_string -> "+FLAG);
}


function equals_string_bypass(){
    var a = Java.use("sg.vantagepoint.a.a");
    a.a.implementation = function(arg2,arg3){
        console.log("[+] equal string -> "+this.a(arg2,arg3));
        var string_arg = this.a(arg2,arg3)
        ascii_string(string_arg);
        return this.a(arg2,arg3)
    }
}
Get FLAG
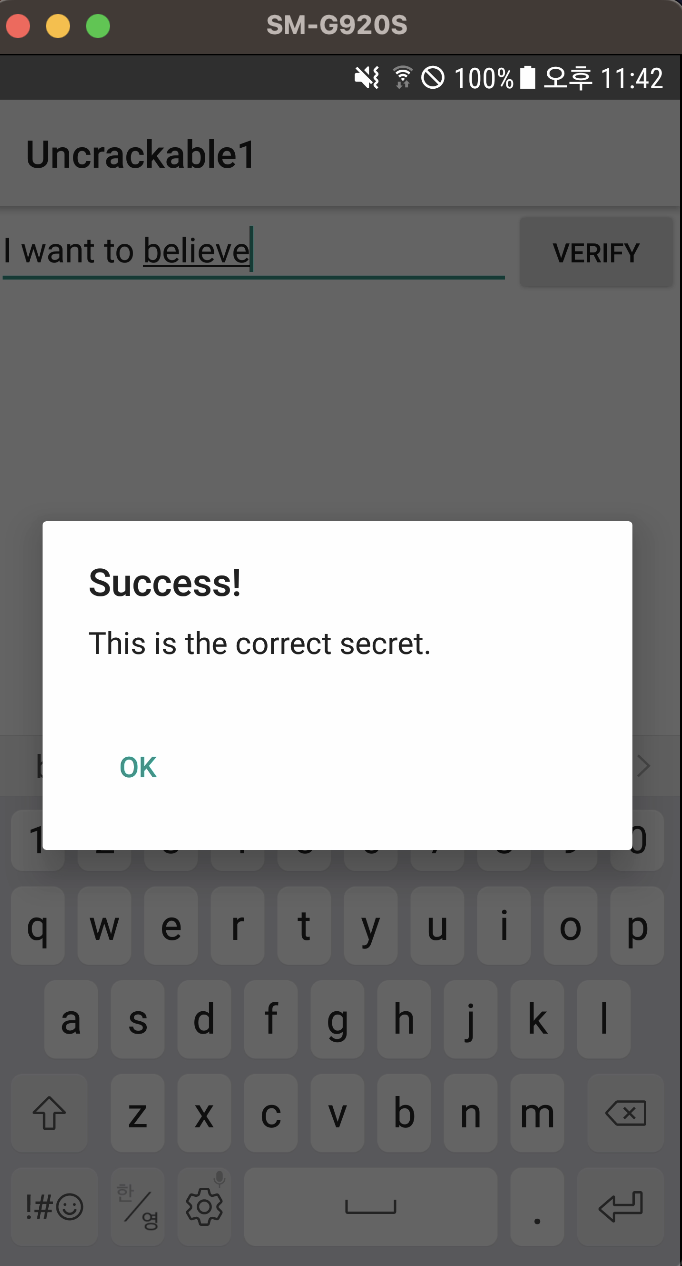
전체 코드는 아래와 같습니다.
1
2
3
4
5
6
7
8
9
10
11
12
13
14
15
16
17
18
19
20
21
22
23
24
25
26
27
28
29
30
31
32
33
34
35
36
37
38
39
40
41
42
43
44
Java.perform(function(){
    console.log("hook")
    exist_su_bypass();
    test_key_bypass();
    equals_string_bypass();
});


function exist_su_bypass(){
    var File = Java.use("java.io.File");
    File.exists.implementation = function(){
        if(this.getName().indexOf("su") > -1){
            console.log("[+] "+this.getName() + "Bypass");
            return false;
        }
        return this.exists()
    }
}

function test_key_bypass(){
    var Build = Java.use("android.os.Build");
    console.log("[+] "+Build.TAGS.value);
    Build.TAGS.value = "release-keys";

}
function ascii_string(string_arg){
    var FLAG ="";
    for (var i=0;i<string_arg.length;i++){
        FLAG += String.fromCharCode(string_arg[i]);
    }
    console.log("[+] verity_string -> "+FLAG);
}


function equals_string_bypass(){
    var a = Java.use("sg.vantagepoint.a.a");
    a.a.implementation = function(arg2,arg3){
        console.log("[+] equal string -> "+this.a(arg2,arg3));
        var string_arg = this.a(arg2,arg3)
        ascii_string(string_arg);
        return this.a(arg2,arg3)
    }
}